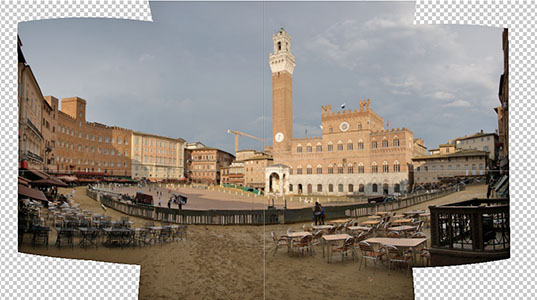
The composition technique of panoramic photo is used to create images with a wide viewing angle and reproduce a landscape that look more similar to the conventional perception of the human eye which has a breadth vision wider than any wide-angle lens.
The panoramic photos are made by assembling side by side several photos. To get a good result it’s very important to use some tricks while shooting the base images.
Some advice before starting: If your machine has the ability to store images to a different folder on the card for the panoramas… do it; however take a photo of a futile object (eg. your finger) before the first photo and after the last photo of your set, will be easier to identify the group of related pictures when you will download them to your pc.
Let’s start from the beginning: the support. The best solution is to use a panoramic tripod head but usually it’s an expensive item and you can fallback to a simple tripod with a traditional ball head or three-dimensional head (three movements). Photos should be taken keeping the camera aligned and stable as much as possible between single shots and try to minimize the axis variations.
Next step: the preliminary settings. On your camera reset any preset styles and work with the most neutral profile you have. Select mode “aperture priority” and work with a rather closed aperture (F12-F16), point the camera toward the center of the panorama that you have, focus and note the time that the exposure meter offers. Switch from autofocus to manual focus. Set the machine to “manual” mode and set the same aperture and the same speed that you recorded earlier. Point again the central area and block the exposure so that it remains fixed for the next photos. With these steps we have set the machine so that it behaves identically for each of the shots preventing focus, exposure or aperture changes. We’re now ready to start shooting!
Usually you’re suggested to take pictures with horizontal camera but in my opinion the best results are achieved by holding the camera vertically because it minimizes the presence of dark vertical stripes between photos during assembly phase. The vertical shoot lets you overlay the long side of the picture and minimizes the vignetting problems that are common to all lenses. You still get darker strips overlapped but they will be horizontal and not vertical and are easier to handle and hide during the blending process in post-production phase. Last but not least, shooting pictures with vertical camera gives a more balanced output images thanks to the increased vertical field view.

The shots can be made from left to right or vice versa but you need an overlapping area between images of about 20%. After taking the stream of sequential photos also take some additional photos in the center area above and below the middle line of the previous photos. The reason is that it often happens that the crop, after the assembly phase, force you to cut some important details in the central area.
If possible avoid any objects or people in the scene that can move in different positions between the clicks, you can have ghosts in the final image.
Now we’re ready for the final step: assembling the images! You need a good software that offers you the opportunity to also manually interact at various stages of the project that are:
There are several softwares that you can use to compose panoramic images, I strongly suggest one of the following that in my experience are working great:
Have a nice panorama composition!
ScriS

Questo sito usa Akismet per ridurre lo spam. Scopri come i tuoi dati vengono elaborati.
Leave a Comment